Background:
The Sopwith Camel was the most famous British fighter aeroplane of World War One. The Camel, so-called because of the hump-shaped protective covering over its machine guns, shot down more enemy aircraft than any other Allied fighter ‘plane during World War One.
The Sopwith Camel was a British First World War single-seat biplane fighter aircraft introduced on the Western Front in 1917. Manufactured by the Sopwith Aviation Company, it used a rotary engine, and had twin synchronized machine guns. Though difficult to handle it offered very good maneuverability to an experienced pilot. It also served as a ground-attack aircraft, especially towards the end of the war when it had become outclassed in the air-to-air role. In those golden age of aviation the Camel definitely was a flying piece of art.
The scaled version which we are attempting to build is a balsa and ply RC (Remote Control model) which is available at RcBazaar which is a the best hobby shop in India for aeromodelling. This plane can be used for electric or gas powered engines. This is a 4 channel RC Plane and is not for beginners or a first time build or flyer.
Specifications of this model aircraft:
Wingspan: 1520mm
Fuselage: 1020mm
Flying Weight: 2700-3300gms
Motor: Avionic 35 or 42 series brushless, for Gassers you a 15-20CC engine
ESC: Wolpack 60 – 80 Amps
Servo: 17g ms x 4nos (2 for ailerons, one for rudder and one for elevator)
Prop: 14-15inch dia
Battery: Wolfpack 22.2V (6S) 2600-4000 mAh
Things you need to have before you start this build
Flat table
holding pins
set of hobby knives
CA glue
plastic clamps
Sandpaper
Lets open the kit an see what we get inside.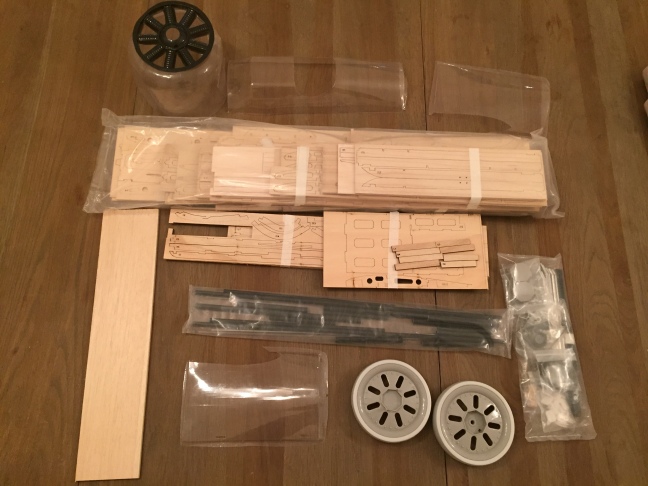
kits comes with a ton of Balsa, aeroply (lite ply), paulownia laser cut sheets, CF rods and tubes, Plastic cowl, canopy, wheels, hinges, steel rigging wires, hinges, clevises, screws, wing joiners, tail wheel assembly unit and lots of other accessories. Comes tightly packed in a large brown box. Have to say that quite a lot of wood and accessories comes in a good price bracket..
This build will give you a quick overview of the process of assembly and the does and dont to make this model.
VERTICAL AND HORIZONTAL STABILIZER ASSEMBLY
We first started with the easy part of assembling the vertical and horizontal stabilizers (Fin and Tailplane). Parts fit in precisely and we had to do a bit of sanding to remove the wood char burns due to the laser cutter. Below are the pics


FUSELAGE ASSEMBLY
A. Start with cutting our the 3mm fly motor mount formers and start assembling them. these can only fix in a given direction so there are chances of you going on here. next you need to prepare the firewall of the fuselage, sandwich and glue together 3 layers of the firewall as shown below and insert the motor mount into the firewall (no need to glue the mount to the firewall f or now.. this can be glued later)


At any time of the below assembly we recommend NOT TO GLUE any parts as they need a lot of temporary removals and fixes to interlink other parts…
B. Fix the base of the fuselage as shown and see that its square to the firewall, after this proceed with fixing the fuselage former’s as below. Once you feel that all parts are square to each other and all parts perfectly meshed to each other then go ahead and apply CA (cyanoacrylate) if you have are an experienced rc modeler , if not use any other rapid glue (3 min or 2 mins glue) and leave it to set.


C. Proceed to place the Landing gear holders (glue 3 layers of 3mm ply each)and then cover the sides of the fuselage. Again do not glue the sides yes. Its also advisable to insert the CF rods to align the fuselage side (not a mandate but might help to get a better alignment) and remove the CF rods after alignment. Go ahead and glue the sides.


D. Cut and remove the centre wing joiner supports. Assemble them as show below and fix them before you place the fuselage’s top canopy support.


E. Proceed with fixing the top panel of the Fuselage and later start assembling the the canopy as shown.. you are almost finished making your fuselage.


F. Fix stringers on the fuselage, tail plane seat and the base plate where the tail landing gear unit sits. You have now officially finished assembling the Camel’s fuselage


LANDING GEAR AND WING STRUTS ASSEMBLY
A: Pick up the aluminum brackets with the large holes (6mm dia), these are used for the landing gears. Also pick up the 4 sets of 3mm hex scres with blind nuts provided in the kit and fix them on the landing gear support as shown (in-fact you can go ahead and fix these much before applying glue to the fuselage side if you want as this is more easier for maneuvering around.).


B. Pick up the Landing gear connecting rod fix 2 nuts and insert then around as shown.


C. Insert the aluminum bracket as shown into the gaps of the fuselage side former and secure then tightly with the wood screws provided in the kit. Before you tighten them check for alignments using a scale / ruler and a spirit level as this is the place where the center position of the wing seats. Take your time in doing this as this is a critical part of the build…


D. The rear landing skids, you will need to sand or dremel a groove into the rudder also also drill in a 1.5 – 2mm hole and fix the landing skids wire a shown and use a epoxy to fix this in place.The tail plane and fin unit fit perfectly in place into the fuselage as the grooves mesh in perfectly. However before you apply glue check the distance from the wingtips to the tips of the tail plane on both the sides using a thread or a tape and see that both the sides need to be the exact same measurement. And of course and fin and tailplane need to be at right angles – 90deg to each other. So this officially sends the construction of the fuselage… lets now move to the wings.


WINGS ASSEMBLY
This model being a bi-plane you will need to give lot more details needs to be given as compared to the fuselage build. Precision is of importance as both the top and the bottom wings needs to fit in a perfect harmony… So lets get started
Segregate all the wings parts and get yourself organised or it might lead to confusion. Go thought the instruction manual thoroughly and see you have all the parts properly labelled and kept aside of the construction
A. We started building the top wings simultaneously. Parts fit in perfect place, however had a few issues in the laser cut parts of the spares (6mm) some were not cut properly hence we had to go though some efforts in using our blade skills. (be careful not to cut yourself). Few points here from our side is start placing all the parts and fit them like a jigsaw puzzle, do not use any glue till you assemble the entire wing and then use a 90 deg vector to square up all the ribs and start placing a drop of CA to have the ribs in position. once done start fixing the main center spare and the trailing edge and finish off with the tips of the wings…


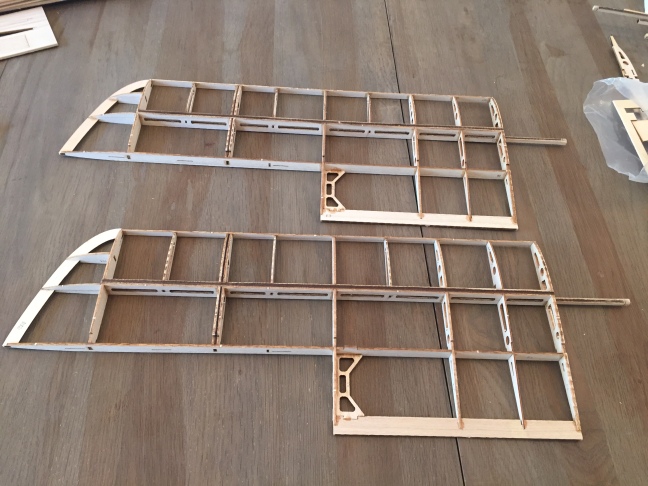
HORROR OF A AEROMODELLER….
Even after building more than 300 different type of balsa models we made the most basic of all errors… we did not pause to think that we were making two numbers of top left wings. After the entire build we placed the top wings and were SHOCKED to see that we had build 2 left wings… so DO NOT MAKE THE SAME ERROR WE DID… take a breather and then continue.. remember aeromodelling is all about patience ….. below is the picture of the fiasco that we did, keep this in mind when you are doing your build… quite embarrassing for us.. but on the brighter side we had a spare top port wings in case of an fight crash 🙂
A. Ailerons were quite a straight forward build.. took a few mins to assemble and apply glue.. below is the sequence of the build..


B. Until we got the new kit from the factory we went ahead and started making the top center section of the wing.. again a very straight forward build but always forward forward and think of the next 2 steps before you build this current step. We used the CF rods to keep the wings aligned before going ahead and gluing the parts together.


C. The Bottom wings were as simple as the top except that the CF tubes – wing joiners needed to be fixed at a certain angel to allow for “dihedral” angel. so be careful and choose the right wing rib roots as they are designed to be fit in the exact plane they need to be, if you miss this your entire build might take a ugly turn.


C. We placed all the wing halves (except for the top right wing as it still had not arrived) and this is how it looks… now if you have done a good build all the parts fit just in place without any “adjustments”. our center section of the top wing slid in place to perfection. There is a good locking mechanism using CF flats, magnet and a steel L shaped wire. this interlocks the top wings and works like a charm.


D. The bottom wings fit perfectly in the fuselage (literally CF rods being inserted into the CF tubes). The wing joiners are 3mm CF flats that fit into the gaps of the wing ribs and you screw them down through the ribs.


ASSEMBLY
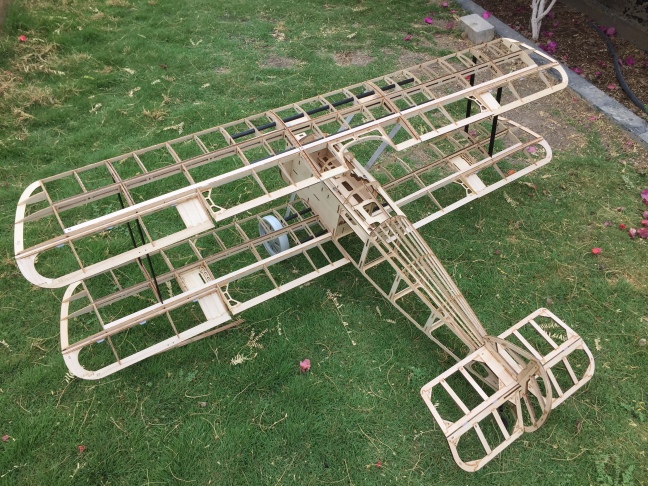
We finally got the right top wing parts and we went into assembly. Below are few picture on how the the model looks after assembly. We have not finished the rigging and the the placement of the leading edges of the wings have not been done yet.. (honestly speaking. this is a LARGE model)


INFERENCE
This kit was a delight to build from the word go… The quality of the wood was superb, the accessories and other parts were also of excellent quality. The build was not too complicated and it took us around 2 weeks of lazy evening to build this. We did not realize how BIG this plane would be during our build. Once finished we were quite surprised on the span and the bulkiness of this scale model. Great value of money. We intend to use a 4 series of a 5 series Avionic motor with a Wolfpack 80 amp esc. Few down of this kit were, the construction manual at one or two places need to be updated, few of the wing struts here not cut in a straight line on the laser hence there were a lot of “jagged” edge we got and had to sand then out evenly. The cowl and canopy were made of plastic and we believe the factory is now coming out with fiberglass cowl and canopy which is great.
In all this is a great value of money build, if you are a WWI plane fan this is a must to have and it looks great as a display unit too. Go ahead and get one.. you will never regret the decisions.
